Our first video is now live on our brand new Youtube channel. TOGGLER TV UK will be a hub of how-to and informational videos all about the TOGGLER fixings, allowing you to see firsthand how secure and easy the range of TOGGLER fixings are to use.
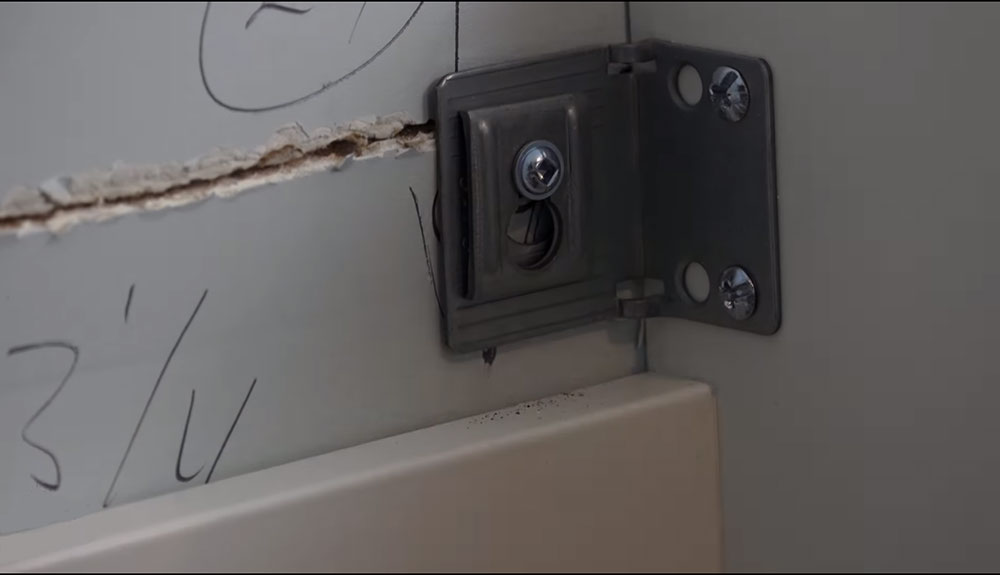
Take a look at how we installed this radiator to a plasterboard wall, with our inhouse product tester demonstrating the strength the Snaptoggle bolts truly have.
Hanging up pictures is a common practice amongst the majority of households; however, it can prove difficult to find a fixing that offers secure holding in hollow substrates such as plasterboard. It is becoming increasingly popular for internal walls to be made up of less substrate allowing for higher amounts of insulation, increasing the household’s EPC rating. Subsequently, causing issues when using a standard wall anchor. Due to the fixing being pulled back through when placed under small amounts of pressure.
The TH Picture Hook anchor is a cost-effective solution to confidently fix pictures to hollow walls. Designed to provide vibration-proof holding in hollow substrates up to 13mm thick, this anchor comes with a built-in hook for hanging pictures with no need for additional fixtures. Featuring several benefits over standard fixings, the Picture Hook anchor installs through a hole of only 8mm diameter and has anti-rotation fins to prevent spin-out, a common issue found with regular hollow wall anchors.
Whilst other anchors may look similar to the Picture Hook in design, they often require a larger installation hole (weakening their hold) and damage the rear side of the wall, especially those made from metal. These are often limited to a designated grip range making them useless in unexpected situations, whereas the Picture Hook has a grip range of 9.5-13mm.
Suited for medium-duty applications the TH Picture Hook offers a Tensile Load of up to 65kg and Shear Load of up to 76kg in 12.5mm plasterboard (*UWL). Making it strong enough to hold even the heaviest of picture frames in hollow substrates, something that standard fixings simply can’t offer.
Unlike standard hollow wall anchors, the Picture Hook is corrosion proof, accepts a wide range of screw sizes (3.5-6mm diameter) and allows the screw to be removed and re-inserted without warping the fixing and reducing its hold strength.
Using the TH Picture Hook anchor, a picture can be securely locked to hollow walls in four simple steps.
Drill an 8mm hole into the wall and fold the anchor in the middle.
Insert the anchor into the hole and tap until flush.
Insert the red key provided to pop the anchor open behind the hollow wall (do not hammer the key and remove once the anchor has popped open).
Insert the screw into the anchor and tighten until flush with the hook head.
*All load weights indicate the ultimate working load (UWL). Industry safety standards recommend ¼ of UWL.
Wall-mounted panel heaters are a cost-effective alternative to electric radiators, suitable for use in both commercial and domestic properties. These systems are ideal for rooms that are occupied less frequently.
The process behind fixing the heater to a wall is relatively simple. However, due to their low-cost design, the fixings provided with the heater are often poor in quality and therefore weak. This will cause issues when securing the heater, as its weight and thus the pressure placed on the fixing will be more than it can withstand. Resulting in the fixing being pulled back through the wall (fixing failure). An expensive mistake to be making, as replacing the broken heater and fixing damage caused to the wall, will cost more than simply using higher quality fixings to secure it in the first place.
This is where the ALLIGATOR Anchor comes into play. The TOGGLER ALLIGATOR is an all-purpose plug anchor designed for heavy-duty applications in solid walls but also holds securely when used in weaker cavities, such as hollow brick or plasterboard. Providing strength and security, the ALLIGATOR plug is a suitable solution for fixing heaters of all sizes in almost any substrate.
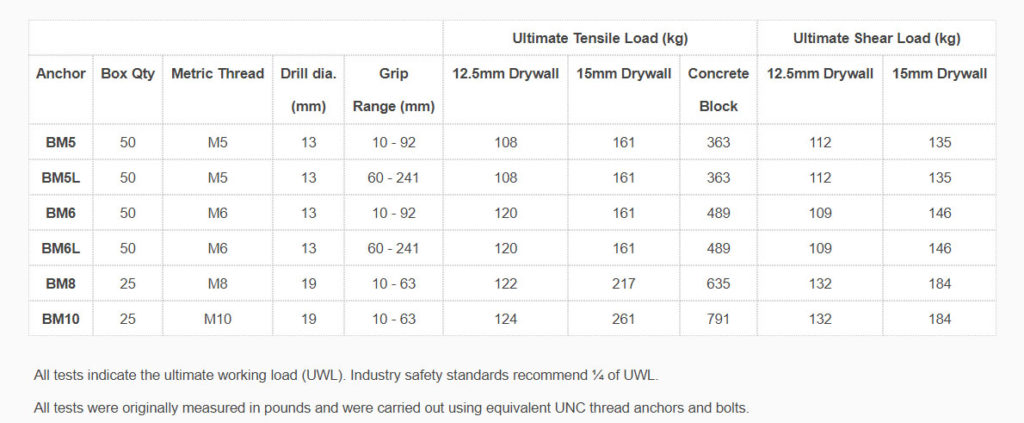
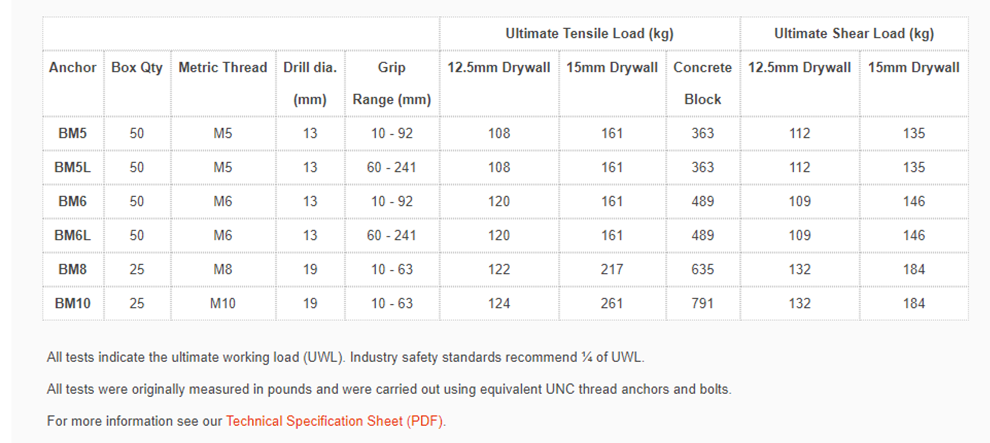
As mentioned above, one of the key benefits of the ALLIGATOR plug is that it is suited for fixing within both solid and hollow walls. Therefore, if you’re looking to fix panel heaters in either structural walls or partition walls the ALLIGATOR will provide a secure fixing for each application. Removing the cost of buying fixings that are designed specifically for each wall type, as the ALLIGATOR will work in both. Refer to the table below, for the Shear and Tensile strengths of the ALLIGATOR Plug range.
Along with its strength, the ALLIGATOR plug provides a number of other benefits when put against comparable fixings on the market. Other solid wall anchors such as shield and expansion anchors require; a precise hole to be drilled, a calibrated torque wrench for installation and won’t work in an unforeseen cavity. Filtering out a large proportion of the applications in which they can be used for, and elongates the process of correctly installing them into the wall.
Chemical and epoxy anchors are high in cost, time-consuming to install and require specific conditions to set correctly. Each of these issues will reduce productivity when installing the anchors in to the wall, especially for applications where multiple fixings are required.
The Alligator plug, whereas, can be installed in seconds using any drill, due to its anti-rotation fins that prevent spinning of the fixing. The anchor sets instantly and accepts a wide range of screws. All of these factors should be considered when installing panel heaters, as they can have a significant impact on the time and effort that is required when securing the heater.
When using the ALLIGATOR Plug, a panel heater can be securely mounted to the wall in 3 simple steps:
Drill a hole into the chosen wall, with the same diameter as the anchor.
Push the anchor into the hole and tap until flush with the wall.
Place the panel heater over the fixing and insert the screw through the designated area, before tightening into the anchor until flush with the wall.
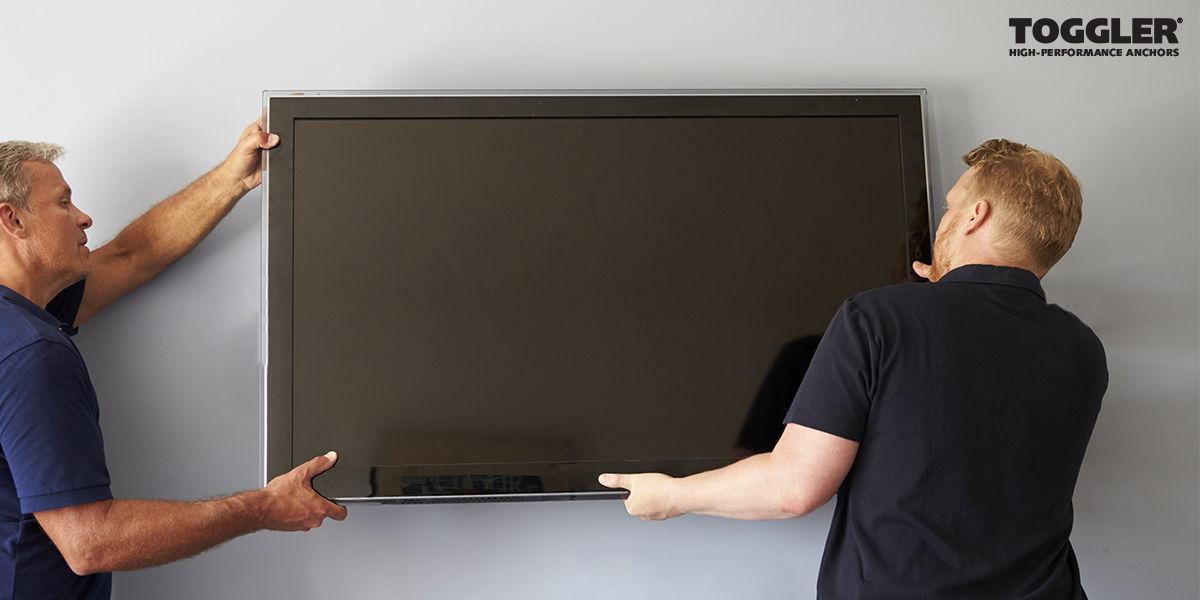
It is becoming increasingly common in new build properties to have more insulation and less substrate when building the internal walls. Giving the house a higher EPC rating but subsequently having less strength in the walls when using standard fixings, and with the Rugby World Cup fast approaching thousands of households across the UK will be setting up their new TV’s.
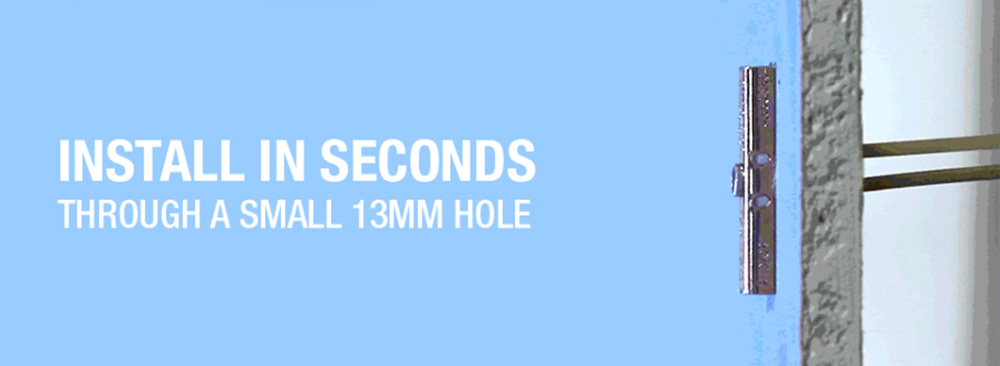
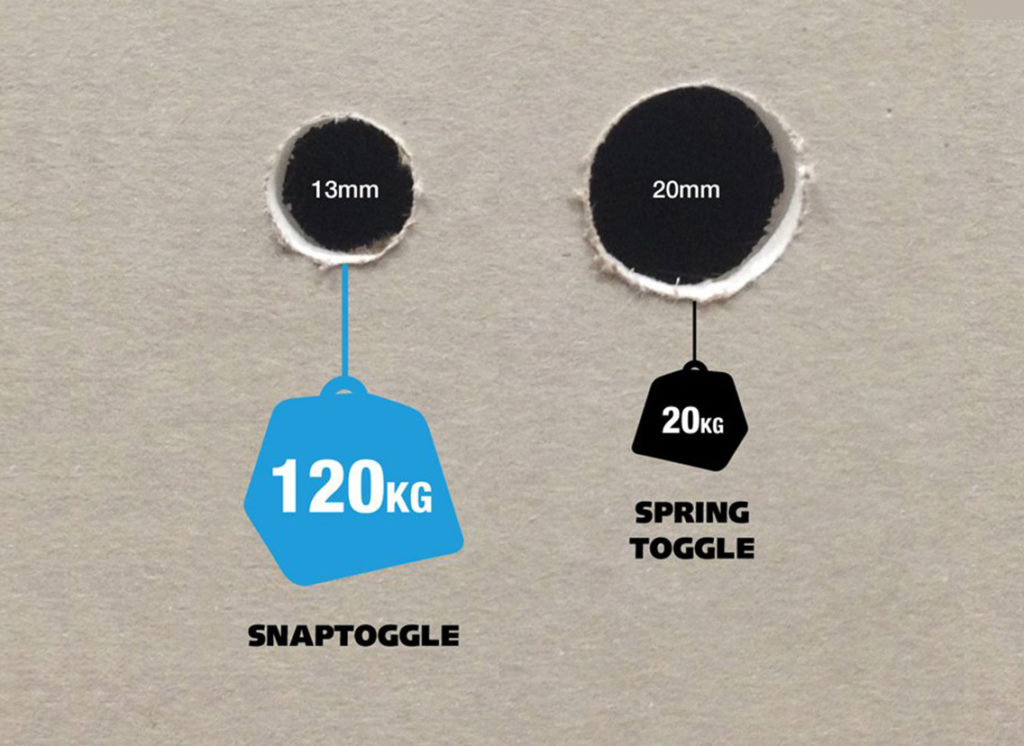
Introducing the SNAPTOGGLE. Also know as the heavy duty anchor the SNAPTOGGLE has an Ultimate Weight Load* of 120kg in standard 12.5mm plasterboard and with just a 13mm drilled hole needed for the fixing it as tidy as it is strong. Even with the most excessive TV’s you can be sure to fix with confidence.
In addition to having large strength loads, SNAPTOGGLE is also one of the simplest plasterboard fixings to install. The fixing takes seconds to use thanks to its patented strap design. The three simple steps for using SNAPTOGGLE with a wall-hung TV would be as follows:
Drill the 13mm holes into the plasterboard wall in the area desired.
Slide the fixings through each of the holes and pull the cap down the straps to the plasterboard
Snap the straps off level with the flange of the caps.
Place the TV mounting bracket over the caps then insert and tighten up the bolt to hold the bracket into place.
And just like that, you have your new TV securely fixed to the wall with confidence that it will hold up for not only the Rugby World Cup, but for years to come.
Wall mirrors are a common object that have endless applications, whether it be a small bathroom mirror or a luxury one for a high-end showroom. A well-placed mirror can make or break the overall appearance of a room, as they alter the appearance of the room size and can add touch of class to almost any environment.
Due to glass being a fairly heavy-duty material, fixing a mirror to the wall can be a difficult task. The chances of a weak fixing being pulled back through the wall when supporting the mirror are high. Not only can this be a costly mistake, but cleaning up the remains of a shattered mirror can be time-consuming and quite dangerous. For this reason, we suggest using the SnapSkru plasterboard anchor with all mirror applications.
The standard fixings supplied with a mirror will more often than not be for solid walls, making their design flawed for plasterboard applications. The pressure from a heavy-duty mirror will cause the fixings sharp thread to cut back through the plasterboard, ultimately leading to fixing failure.
The TOGGLER SnapSkru is the only self-drilling plasterboard anchor that symmetrically locks on to the wall for a truly secure fastening – with up to 80% more holding power than conventional anchors on the market. With a tensile strength of 36kg (UWL) in 12.5mm plasterboard, SnapSkru is the ideal fixing for any mirror applications.
SnapSkru’s built-in positive stop resists over-drilling and then opens with an audible “pop”, positively locking the anchor to the rear of the wall to resist vibration and shock. Meaning, you can fix the mirror to the wall with confidence that will remain there securely, for years to come.
Not to mention, SnapSkru’s ease of installation sets it apart from other anchors on the market. Securing the mirror to a plasterboard wall can be achieved with three simple steps:
Drive the anchor clockwise into drywall until anchor stops flush with the outer wall surface.
Place the mirror over the anchor and insert the screw fully in.
Tighten the screw flush with the item, until you hear the “pop” of the anchor locking to the rear of the wall.
* All strength loads indicate the ultimate working load (UWL). Industry safety standards recommend ¼ of UWL.
As the heat from the summer sun starts to cool down and the nights start to draw in, your attention turns from days out enjoying the sun to cosy nights indoors. Lighting will play a key part in the ambience and mood of your cosy nights, but what if you discover you can’t put a light fitting up securely because your walls or ceiling are just plasterboard? The challenge with fixing into a weak substrate like plasterboard is there isn’t enough material behind it for a regular fixing to achieve a secure hold to the fitting.
The standard fixings supplied with the light fittings will more often than not be for solid walls, whilst regular hollow wall anchors require a larger drilling hole that can weaken the cavity wall.
The TOGGLER Hollow Wall Anchor is designed for medium-duty applications in hollow substrates such as plasterboard, with an Ultimate Working Load (UWL) of 65kg in 12.5mm plasterboard. It also offers significantly higher strength loads (both shear and tensile), and can be installed through a drilled hole of only 8mm.
Not to mention, the TOGGLER Hollow Wall Anchor has anti-rotation fins which prevents spin-out and locks to the cavity wall, forming a truss-like structure for secure locking of the fixing.
Not only does the Hollow Wall Anchors working load separate it from others within the market, but its ease of installation also makes it stand apart from the cheaper fixings. It can be installed to both ceilings and walls with four simple steps:
Drill the 8mm hole, and fold the anchor in the middle.
Insert the anchor into the hole and tap into the substrate until flush.
Insert the red key provided to pop the fixing open behind the cavity wall (not necessary for thick or solid walls). Do not hammer the key into the anchor, and remove once it has popped open.
Place the light fitting over the anchor. Insert a screw and tighten until flush with the item (do not overtighten).
Perform these four simple steps correctly, and your lighting fitting will remain locked securely to the plasterboard wall or ceiling for years to come!
*The recommended safe working load is a quarter of the Ultimate Working Load (UWL)
As we’re coming up to the start of the 2019-20 Premier League football season, thousands of households across the UK will be setting up their old and new TV’s in anticipation for the opening match (August 9th). However, many of those preparing to watch the game will have an unexpected shock when their valuable TV is pulled off their wall, due to failure of the fixings provided with it.
To ensure your TV remains fixed to the wall for the entire football season, and many years to come; we recommend SNAPTOGGLE.
These days, the trend appears to be more and more households moving towards larger, and consequently heavier television systems. With flat screen TV’s weighing in the range of 3-70kg+ (depending of type/size), it is highly important to choose an anchor that will guarantee a secure fixing, with no risks being taken. This is where SNAPTOGGLE comes into play. SNAPTOGGLE is the ideal fixing to use when looking to firmly secure heavy objects to any cavity wall including plasterboard.
With an Ultimate Weight Load (UWL) of 120kg in 12.5mm plasterboard*, SNAPTOGGLE provides enough strength to firmly hold any TV onto a cavity wall, without the worry of fixing failure.
Not to mention, the SNAPTOGGLE only requires a small 13mm drill hole, along with its long pivoting head which locks into place over the hole, allowing an even weight distribution across the entire fixing. This locks the fixing in place, ensuring you can put your beloved TV up with confidence.
In addition to having a high weight loading, SNAPTOGGLE is also one of the simplest plasterboard fixings to install. The three simple steps for using SNAPTOGGLE with a wall-mounted TV would be as follows:
1. Drill the 13mm holes into the plasterboard wall in the area desired.
2. Slide the fixings through each of the holes and pull the cap down the straps to the plasterboard and then snap the straps off level with the flange of the caps.
3. Place the TV mounting bracket over the caps then insert and tighten up the bolt to hold the bracket into place.
And just like that, you have your TV securely fixed to the wall ready for the start of the football season, with no danger of it falling down.
*The recommended safe working load is a quarter of the Ultimate Working Load (UWL)
When it comes to installing wall hung vanity units to plasterboard it is crucial to ensure that the mounting brackets are fixed into place with fixings that have the strength to hold up the weight of the system. This is because although the fixings provided with the brackets may appear to have sufficient strength, it is possible that they do not (a risk not worth taking). This is why it is always a safer option to buy fixings specifically designed to hold large amounts of weight on plasterboard, such as the SNAPTOGGLE from TOGGLER. The weight of the unit will depend on the style, size and material used, which in some cases, the fixings provided may not be of the strength needed to hold it in place.
Generally, wall hung vanity units range from 300-700mm in height and 400-1200mm in width, and have a weight range of between 10-75kg+ (as a general guide). You will, therefore, need to choose a plasterboard fixing that has the strength to hold the brackets in place with the unit attached. This is especially important with vanity units as their weight is distributed differently to that of household systems such as radiators. For example, the unit protrudes further out from the wall than a radiator would, meaning that if pressure was applied to the system (e.g. an individual leaning on the sink) it would need to overcome a higher level of force placed upon the bracket.
Vanity Unit Mounting Bracket
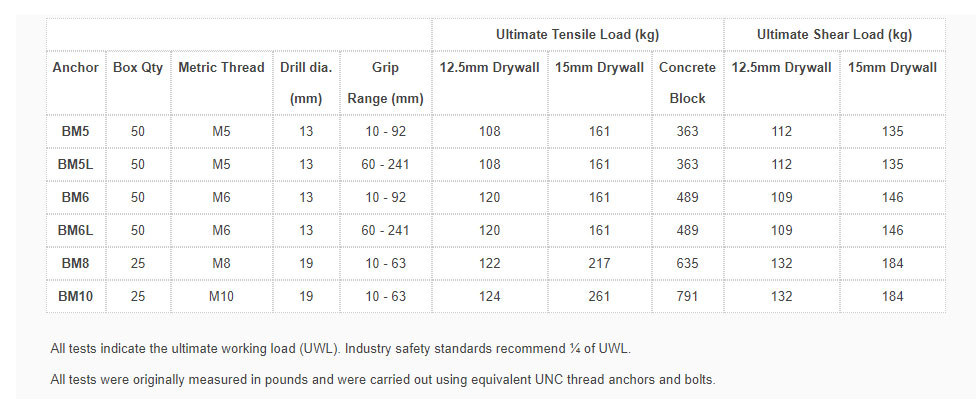
SNAPTOGGLE would be the ideal fixing to use for a vanity unit that is being fixed to plasterboard as it is designed for applications that require heavy items to be hung from plasterboard walls. Also, with a range of six different SNAPTOGGLE fixings each with different Tensile and Shear strengths (see chart below), there is no doubt that you will find one that is suited to your individual application. Vanity units can cost between £60 – £2,000+ depending on the style and size, meaning if you’re looking to hang one on a plasterboard wall it would be a smart investment to use TOGGLER and guarantee the rigidity of the fixing and protection of your walls.
As the SNAPTOGGLE only requires a 13mm hole drilled into the
wall this allows for a greater strength than other fixings as it means the wing
has a larger surface area to lock onto, therefore keeping it firmly in place.
Not only that, the SNAPTOGGLE uses one rectangle wing across the entire hole
making it much less likely to be pulled back through the hole.
In addition to TOGGLER fixings having large strength loads, they also are one of the simplest plasterboard fixings to operate. SNAPTOGGLE takes seconds to use as there are no tools required and it simply take three steps to fix it into place. The steps for using SNAPTOGGLE with a wall hung vanity unit would be as follows:
1. Drill the 13mm
holes into the plasterboard wall in the area desired.
2. Slide the fixings
through each of the holes and pull the cap down the straps to the plasterboard
and then snap the straps off level with the flange of the caps.
3. Place the mounting
brackets provided over the caps, then insert and tighten up the bolt to hold
the brackets into place.
As with our blog post based around radiators, boilers too
must be hung using a mounting bracket when used in conjunction with
plasterboard walls. When it comes to fitting boilers to plasterboard it is crucial
to ensure that the wall bracket is fixed into place with fixings that have the
strength to hold up the weight of the boiler. This means that the same issues
can occur (fixing failure) with boilers if fixed in using plasterboard fixings
that are not of a suitable strength. Boilers come in a range of dimensions and
weights usually depending on their heat output (the higher the output, the
larger the boiler). The type of boiler will also affect its weight as combi
boilers (provides both heating and hot water) will weigh more than that of a traditional
“Heating Only” boiler.
Boilers can weigh
within the range of 20kg-50kg+ making them perfect for SNAPTOGGLE fixings, showing
that no matter what the application TOGGLER has a solution. If not, there is the
chance that the boiler will pull the bracket out of the wall which can be a
costly mistake (boiler prices can range from £500-£2,000), when TOGGLER
SNAPTOGGLE fixings cost little to nothing in comparison! Below is a chart
displaying the tensile and shear strength of the SNAPTOGGLE fixings for
comparison with boiler weight.
Another benefit of the SNAPTOGGLE is that for the amount of
weight each fixing can hold up, it still only requires a 13mm hole to go
through which is relatively small when compared to other comparable fixings.
The advantage of this is that the larger the hole in the plasterboard is the
weaker the fixing becomes, as there is less surface area for the metal channel
of the fixing to lock onto. This means that the fixing is more prone to being
pulled back through the plasterboard whereas SNAPTOGGLE, with its long metal
channel and small drill diameter, will remain securely locked into place.
In addition to TOGGLER fixings having such large strength loads, they also are one of the simplest plasterboard fixings to operate. SNAPTOGGLE takes seconds to install as there are no tools required and it simply take three steps to fix it into place. The steps for using SNAPTOGGLE with a boiler would be as follows:
1. Drill the 13mm holes into the plasterboard wall in the area desired.
2. Slide the fixings through each of the holes and pull the cap down the straps to the plasterboard and then snap the straps off level with the flange of the caps.
3. Place the boiler bracket over the caps then insert and tighten up the bolt to hold the bracket into place.
When it comes to fitting radiators to plasterboard it is crucial to ensure that the wall bracket is fixed into place with fixings that have the strength to hold up the weight of the system. This is because although the fixings provided with the wall bracket may appear to be strong enough it is possible that they are not (a risk not worth taking), which is why it is always a safer option to buy fixings specifically designed to hold large amounts of weight on plasterboard, such as the TOGGLER SNAPTOGGLE. The weight of the radiator will depend on the type and size and in some cases the fixings provided with the radiator may not be of the strength needed to hold it in place.
Central Heating radiators can range from 300 x 600mm to 600 x 2400mm and can weight between 5kg-85kg+, therefore you will need to choose a plasterboard fixing that has the strength to hold the bracket in place with the radiator attached. Although the weight of a radiator is spread out more evenly than that of a boiler due to their larger surface area and thinner design, it is still essential to choose fixings that are guaranteed to hold the system up.
SNAPTOGGLE would be the ideal fixing to use for a radiator
that is being fixed to a plasterboard wall as it is designed for applications
that require heavy items to be hung from plasterboard. Also, with a range of
six different SNAPTOGGLE fixings each with different Tensile and Shear
strengths (see chart below), there is no doubt that you will find one that is
suited to your individual application. Radiators can cost between £10 – £300+
depending on the type and size, meaning if your looking to hang one to a
plasterboard wall it would be a smart investment to use TOGGLER and guarantee
the rigidity of the fixing and protection of your walls.
As the SNAPTOGGLE only requires a 13mm hole drilled into the
wall this allows for a greater strength than other fixings as it means the wing
has a larger surface area to lock onto, therefore keeping it firmly in place.
Not only that, the SNAPTOGGLE uses one rectangle wing across the entire hole
making it much less likely to be pulled back through the hole.
In addition to TOGGLER fixings having large strength loads, they also are one of the simplest plasterboard fixings to operate. SNAPTOGGLE takes seconds to use as there are no tools required and it simply take three steps to fix it into place. The steps for using SNAPTOGGLE with a radiator would be as follows:
1. Drill the 13mm
holes into the plasterboard wall in the area desired.
2. Slide the fixings
through each of the holes and pull the cap down the straps to the plasterboard
and then snap the straps off level with the flange of the caps.
3. Place the radiator
bracket over the caps then insert and tighten up the bolt to hold the bracket
into place.